
Indian Cooking Challenge
Daring Baker

Get A Freelancer
Online
Daring Bakers July 2008 - Filbert Gateau with Praline Buttercream
25 comments Posted by Medhaa on Wednesday, July 30, 2008Daring bakers was hosted by Chris of Melecotte, when the challenge was revealed, I was happy but Butter cream and piping are not something I have just done once in the Opera Cake Challenge. 
I followed the recipe and did not use the alcohol. I used 3 8 inch pans instead of making one and then cutting it. I loved this challenge, I made it on my Birthday and we all loved it. Loved the nutty taste of hazlenut. Ok I skipped piping I am really bad at it I tried and it looked horrible so just decided to decorate the cake with some toasted hazlenuts dipped in yummy chocolate.
Filbert Gateau with Praline Buttercream
From Great Cakes by Carol Walter
1 Filbert Genoise
1 recipe sugar syrup, flavored with dark rum
1 recipe Praline Buttercream
½ cup heavy cream, whipped to soft peaks
1 recipe Apricot Glaze
1 recipe Ganache Glaze, prepared just before using
3 tablespoons filberts, toasted and coarsely chopped
Filbert Genoise
1 ½ cups hazelnuts, toasted/skinned
2/3 cup cake flour, unsifted
2 Tbsp. cornstarch
7 large egg yolks
1 cup sugar, divided ¼ & ¾ cups
1 tsp. vanilla extract
½ tsp. grated lemon rind
5 lg. egg whites
¼ cup warm, clarified butter - 100 – 110 degrees
- Position rack in the lower 3rd of the oven and preheat to 350 degrees. Grease and flour a 10” X 2” inch round cake pan.
- Using a food processor, process nuts, cake flour, and cornstarch for about 30 seconds. Then, pulse the mixture about 10 times to get a fine, powdery mixture. You’ll know the nuts are ready when they begin to gather together around the sides of the bowl. While you want to make sure there aren’t any large pieces, don’t over-process. Set aside.
- Put the yolks in the bowl of an electric mixer, with the whisk attachment, and beat until thick and light in color, about 3-4 minutes on med-high speed. Slowly, add ¾ cup of sugar. It is best to do so by adding a tablespoon at a time, taking about 3 minutes for this step. When finished, the mixture should be ribbony. Blend in the vanilla and grated lemon rind. Remove and set aside.
- Place egg whites in a large, clean bowl of the electric mixer with the whisk attachment and beat on medium speed, until soft peaks. Increase to med-high speed and slowly add the remaining ¼ cup of sugar, over 15-20 seconds or so. Continue to beat for another ½ minute.
- Add the yolk mixture to the whites and whisk for 1 minute.
- Pour the warm butter in a liquid measure cup (or a spouted container). * It must be a deep bottom bowl and work must be fast.* Put the nut meal in a mesh strainer (or use your hand – working quickly) and sprinkle it in about 2 tablespoons at a time – folding it carefully for about 40 folds. Be sure to exclude any large chunks/pieces of nuts. Again, work quickly and carefully as to not deflate the mixture. When all but about 2 Tbsp. of nut meal remain, quickly and steadily pour the warm butter over the batter. Then, with the remaining nut meal, fold the batter to incorporate, about 13 or so folds.
- With a rubber spatula, transfer the batter into the prepared pan, smoothing the surface with the spatula or back of a spoon. **If collected butter remains at the bottom of the bowl, do not add it to the batter! It will impede the cake rising while baking.
- Tap the pan on the counter to remove air bubbles and bake in the preheated oven for 30-35 minutes. You’ll know the cake is done when it is springy to the touch and it separates itself from the side of the pan. Remove from oven and allow to stand for 5 minutes. Invert onto a cake rack sprayed with nonstick coating, removing the pan. Cool the cake completely.
*If not using the cake right away, wrap thoroughly in plastic wrap, then in a plastic bag, then in the refrigerator for up to 3 days. If freezing, wrap in foil, then the bag and use within 2-3 months.
Sugar Syrup
Makes 1 cup, good for one 10-inch cake – split into 3 layers
1 cup water
¼ cup sugar
2 Tbsp. dark rum or orange flavored liqueur
In a small, yet heavy saucepan, bring the water and sugar to a boil and simmer for 5 minutes. Remove from heat, add the liqueur. Cool slightly before using on the cake. *Can be made in advance.
Praline Buttercream
1 recipe Swiss Buttercream
1/3 cup praline paste
1 ½ - 2 Tbsp. Jamaican rum (optional)
Blend ½ cup buttercream into the paste, then add to the remaining buttercream. Whip briefly on med-low speed to combine. Blend in rum.
Swiss Buttercream
4 lg. egg whites
¾ cup sugar
1 ½ cups (3 sticks) unsalted butter, slightly firm
1 ½ -2 Tbsp. Grand Marnier or liqueur of your choice
1 tsp. vanilla
- Place the egg whites in a lg/ bowl of a elevtric mixer and beat with the whisk attachment until the whites are foamy and they begin to thicken (just before the soft peak stage).
- Set the bowl over a saucepan filled with about 2 inches of simmering water, making sure the bowl is not touching the water. Then, whisk in the sugar by adding 1-2 tablespoon of sugar at a time over a minutes time.
- Continue beating 2-3 minutes or until the whites are warm (about 120 degrees) and the sugar is dissolved. The mixture should look thick and like whipped marshmallows.
- Remove from pan and with either the paddle or whisk attachment, beat the egg whites and sugar on med-high until its a thick, cool meringue – about 5-7 minutes. *Do not overbeat*. Set aside.
- Place the butter in a separate clean mixing bowl and, using the paddle attachment, cream the butter at medium speed for 40-60 seconds, or until smooth and creamy. *Do not overbeat or the butter will become toooooo soft.*
- On med-low speed, blend the meringue into the butter, about 1-2 Tbsp. at a time, over 1 minute. Add the liqueur and vanilla and mix for 30-45 seconds longer, until thick and creamy.
- Refrigerate 10-15 minutes before using.
Wait! My buttercream won’t come together! Reheat the buttercream briefly over simmering water for about 5 seconds, stirring with a wooden spoon. Be careful and do not overbeat. The mixture will look broken with some liquid at the bottom of the bowl. Return the bowl to the mixer and whip on medium speed just until the cream comes back together.
Wait! My buttercream is too soft! Chill the buttercream in the refrigerator for about 10 minutes and rewhip. If that doesn’t work, cream an additional 2-4 Tbsp. of butter in a small bowl– making sure the butter is not as soft as the original amount, so make sure is cool and smooth. On low speed, quickly add the creamed butter to the buttercream, 1 Tbsp. at a time.
Refrigerate in an airtight container for up to 5 days, or can be frozen for up to 6 months. If freezing, store in 2 16-oz. plastic containers and thaw in the refrigerator overnight or at room temperature for several hours.
Praline Paste
1 cup (4 ½ oz.) Hazelnuts, toasted/skinless
2/3 cup Sugar
Line a jelly roll pan with parchment and lightly butter.
- Put the sugar in a heavy 10-inch skillet. Heat on low flame for about 10-20 min until the sugar melts around the edges.
- Do not stir the sugar. Swirl the pan if necessary to prevent the melted sugar from burning.
- Brush the sides of the pan with water to remove sugar crystals. If the sugar in the center does not melt, stir briefly.
- When the sugar is completely melted and caramel in color, remove from heat.
- Stir in the nuts with a wooden spoon and separate the clusters.
- Return to low heat and stir to coat the nuts on all sides. Cook until the mixture starts to bubble. **Remember – extremely hot mixture.**
- Then onto the parchment lined sheet and spread as evenly as possible. As it cools, it will harden into brittle.
- Break the candied nuts into pieces and place them in the food processor. Pulse into a medium-fine crunch or process until the brittle turns into a powder.
- To make paste, process for several minutes. Store in an airtight container and store in a cook dry place. Do not refrigerate.
Apricot Glaze
Good for one 10-inch cake
2/3 cup thick apricot preserves
1 Tbsp. water
- In a small, yet heavy saucepan, bring the water and preserves to a slow boil and simmer for 2-3 minutes. If the mixture begins to stick to the bottom of the saucepan, add water as needed.
- Remove from heat and, using a strainer, press the mixture through the mesh and discard any remnants. With a pastry brush, apply the glaze onto the cake while the cake is still warm. If the glaze is too thick, thin to a preferred consistency with drops of water.
Ganache Glaze
Makes about 1 cup, enough to cover the top and sides of a 9 or 10 inch layer or tube cake
**Ganache can take on many forms. While warm – great fudge sauce. While cool or lukewarm – semisweet glaze. Slightly chilled – can be whipped into a filling/frosting. Cold & solid – the base of candied chocolate truffles.
6 oz. (good) semisweet or bittersweet chocolate, like Lindt
6 oz. (¾ cup heavy cream
1 tbsp. light corn syrup
1 Tbsp. Grand Marnier, Cointreay, or dark Jamaican rum (optional)
¾ tsp. vanilla
½ - 1 tsp. hot water, if needed
- Blend vanilla and liqueur/rum together and set aside.
- Break the chocolate into 1-inch pieces and place in the basket of a food processor and pulse until finely chopped. Transfer into a medium sized bowl and set aside.
- Heat the cream and corn syrup in a saucepan, on low, until it reached a gentle boil. Once to the gently boil, immediately and carefully pour over the chocolate. Leave it alone for one minute, then slowly stir and mix the chocolate and cream together until the chocolate is melted and incorporated into the cream. Carefully blend in vanilla mixture. If the surface seems oily, add ½ - 1 tsp hot water. The glaze will thicken, but should still be pourable. If it doesn’t thicken, refrigerate for about 5 minutes, but make sure it doesn’t get too cold!
Assembling Cake
- Cut a cardboard disk slightly smaller than the cake.
- Divide the cake into 3 layers and place the first layer top-side down on the disk.
- Using a pastry brush, moisten the layer with 3-4 Tbsp. of warm sugar syrup. Measure out 1 cup of praline buttercream and set aside.
- Spread the bottom layer with a ¼-inch thickness of the remaining buttercream. Cover with ½ of the whipped cream, leaving ¼-inch border around the edge of the cake.
- Place the middle layer over the first, brush with sugar syrup, spreading with buttercream. Cover with the remaining whipped cream.
- Moisten the cut side of the third layer with additional sugar syrup and place cut side down on the cake. Gently, press the sides of the cake to align the layers.
- Refrigerate to chill for at least 30 minutes.
- Lift the cake by sliding your palm under the cardboard. Holding a serrated or very sharp night with an 8-ich blade held parallel to the sides of the cake, trim the sides so that they are perfectly straight.
- Cut a slight bevel at the top to help the glaze drip over the edge. Brush the top and sides of the cake with warm apricot glaze, sealing the cut areas completely.
- Chill while you prepare the ganache.
- Place a rack over a large shallow pan to catch the ganache drippings.
- Remove the gateau from the refrigerator and put it the rack. With a metal spatula in hand, and holding the saucepan about 10 inches above the cake, pour the ganache onto the cake’s center. Move the spatula over the top of the ganache about 4 times to get a smooth and mirror-like appearance. The ganache should cover the top and run down the sides of the cake.
- When the ganache has been poured and is coating the cake, lift one side of the rack and bang it once on the counter to help spread the ganache evenly and break any air bubbles. (Work fast before setting starts.) Patch any bare spots on the sides with a smaller spatula, but do not touch the top after the “bang”.
- Let the cake stand at least 15 minutes to set after glazing.
- To garnish the cake, fit a 12 – 14-inch pastry bag with a #114 large leaf tip.
- Fill the bag with the reserved praline cream. Stating ½ inch from the outer edge of the cake, position the pastry tube at a 90 degree angle with the top almost touching the top of the cake. Apply pressure to the pastry bag, moving it slightly toward the center of the cake. As the buttercream flows on the cake, reverse the movement backward toward the edge of the cake and finish by pulling the bag again to the center. Stop applying pressure and press the bag downward, then quickly pull the tip up to break the flow of frosting. Repeat, making 12 leaves evenly spaced around the surface of the cake.
- Make a second row of leaves on the top of the first row, moving the pastry bag about ¾ inch closer to the center. The leaves should overlap. Make a 3rd row, moving closer and closer to the center. Add a 4th row if you have the room. But, leave a 2-inch space in the center for a chopped filbert garnish.
- Refrigerate uncovered for 3-4 hours to allow the cake to set.
- Remove the cake from the refrigerator at least 3 hours before serving.
Leftover cake can be covered with foil and kept in the refrigerator for up to 5 days.

Click here to view what the other fellow Daring Bakers did
Chutneys - Hari Chutney, Pudina Chutney and Khatta Meetha Chutney
13 comments Posted by Medhaa on Tuesday, July 29, 2008Chutneys are always there at home. Be it to make a quick bhel, make a sandwich or put in yogurt and have. I have two kinds of Hari Chutney, one which mom makes with pudina and the one I prefer or make a milder one with just coriander leaves.
Pudina Chutney - Mama's Chutney
Ingredients:
1 bunch fresh coriander leaves
1/2 bunch fresh pudina leaves
1 medium onion
5-6 green chilies
1 tsp jeera / cumin seeds
1 tsp coriander seeds
sugar as per taste
lime as per taste
salt as per taste
Method
- Wash the greens and green chilies well.
- Grind all the above together using as little water as possible.
- Check seasoning.
- Keep in fridge in an air tight container.
Green Chutney

Ingredients:
1 bunch fresh coriander leaves
1/2 onion
3-4 green chilies
sugar as per taste
lime as per taste
salt as per taste
Method
- Wash the greens and green chilies well.
- Grind all the above together using as little water as possible.
- Check seasoning.
- Keep in fridge in an air tight container.
Khatta Mitha Chutney - Sweet and Sour Chutney

Ingredients
1 cup tamarind
1/2 cup Gur / Jaggery
1 tbsp red chili powder
1/2 tbsp black pepper powder (Optional)
1 tbsp cumin powder (optional)
black salt as per taste
Method
- Wash the tamarind well.
- Boil the tamarind in jaggery in 2 cups water
- Boil for about 7-8 minutes.
- Cool it to room temperature.
- Grind this mixture in a mixie or Hand Blender.
- Strain the mixture.
- Boil the chutney to get right consistency.
- Add the red chili powder, black pepper powder, cumin powder and salt.
- Cool completely.
- Keep in fridge in an air tight container.

This is the easiest and kid friendly sweet. You can use and flavours and any fruit. I have tried mixed berries, pineapple, strawberry and now raspberry. All have been loved by all.
This is my contribution to the Sweet Series - Cool Desserts hosted by Mythreyee of Paajaka Recipes.
Ingredients
2 packets raspberry jelly/ Jello
1 and 1/2 cup fresh raspberries
400 gms fresh cream
8 tsps sugar
Method
- Make the jelly as per the packet directions. While dissolving the jelly crystals add the sugar too.
- Let the jelly set in the fridge.
- Once the jelly is half set, add the cream and beat well.
- Add 1 cup raspberry and mix well.
- Allow it to set in the refrigerator completely.
- Garnish with the remaining raspberries and serve.

Cabbage is patta gobi in Sindhi. This is my husbands grandmothers (who we all address by mummy) recipe, I have heard that she was great cook and some of her recipes have passed down generations. I am privileged to be able to make them now. This is a quick and yummy curry normally had with chapati, roti, phulka. But try having it with bread it just soaks up the gravy and yumm. The gravy is runny like soup or rasam and the bigger the vegetables are cut the better. The veggies should have a bite to it and should not be overcooked. This is a tangy gravy with the tomatoes and yogurt if you don't like it very tangy just reduce the amount of yogurt.
Ingredients
1/2 cabbage separate each layer and keep them as big as you like.
1 carrot, cut to 1 inch wedges
10 beans, cut to 1 inch pieces
1 potato, cut to 1 inch wedges
1/2 cup onion, chopped
1 tsp coriander powder
1/2 tsp red chili powder
1/4 tsp turmeric powder
1 big tomatoes
2 green chilies
1 inch ginger
1 cup yogurt
fresh coriander leaves for garnish
salt to taste
1/2 cup water
Method
- Puree the Tomato, green chilies and ginger together.
- Heat 2 tsp oil in a pressure cooker and fry the onions till golden brown.
- Add the spices like coriander powder, red chili powder and turmeric. Mix well and cook will oil separates.
- Add the tomato puree and cook till oil separates.
- Add all the vegetables and mix.
- Beat the yogurt well, add it to the cooker.
- Add 1/2 cup water or more if required. Add salt.
- Give 1 whistle. (Big Cookers just one whistle is enough, I have a smaller one and give 2 whistles, The vegetables have to have a bite to them and should not be overcooked)
- Open, adjust consistency, boil if you want to dry it out or add more water and give it a boil for more gravy.
- Check seasoning, garnish with coriander leaves and serve.
Other recipe from Mummy
Dhass Karela
Back to Sindhi Recipe List
This goes to Srivalli's Curry Mela.


Bhinda in Sindhi is Okra, Ladies Finger. I always loved Bhinda in any form but my fav. were fried Bhinda with phulka. Bhinda always reminds me of that one evening when I fell asleep doing my Hindi Homework without having dinner. I woke up in the middle of the night very hungry and even at that hour mama cooked food for me. There was nothing ready so she fried the bhinda and made phulka, every time I remember that I realize the unconditional love mothers have for their children is something that no one will ever understand other than a mother. She still even at this age pampers me the same way.
Sindhi's Love frying most vegetables, but times have changed and due to health reasons there are many who avoid frying. For the authentic Sindhi recipe you will have to deep fry the bhindas before adding them to the gravy. I cook it in the gravy instead. The fried version does taste delicious any day but not so healthy. I have both versions below.
Ingredients
250 gms Bhinda - Okra
2 onions, chopped
2 tomatoes
1 inch ginger
2 green chilies
1 tsp coriander powder
1/2 tsp red chili powder
1/4 tsp turmeric powder
salt to taste
fresh coriander leaves for garnish
Method
Bhinda Preparation
- Wash the bhinda's well.
- Dry them completely using Kitchen towel.
- Cut the ends and discard.
- Cut the Bhindas in one inch pieces. Keep Aside
- For deep fried version: Deep fry them in medium heat in batches till they are soft and cooked well. Do not over cook them. If you like them to be crisp just increase the heat to high in the last 2 minutes of cooking and then remove and drain. Keep Aside. The Crisp version can be eaten just as it is mixed in little salt.
Gravy Preparation
- Puree the tomatoes, ginger and green chili together.
- Heat 1 tsp oil in a pan.
- Add the onions and cook on medium low till they are translucent.
- Add the coriander powder, red chili powder and turmeric powder. Cook for minute till the oil separates.
- Add the pureed tomatoes. cook till the oil separates.
- Add the Bhinda's and salt. Mix well.
- If using fried bhindas, cover and cook on low for 5 minutes for the flavours to mingle. Do not over mix.
- If not using friend Bhindas, cover and cook for 15 minutes or till the bhindas are cooked completely. Keep Stirring in between.
- garnish with coriander leaves and serve along with Khichini, Boondhi Raita and papad.
Back to Sindhi Recipe List

We make this Raita very often. Once you have the Boondi ready its made in a jiffy.
Normally many would soak the Boondi in water for some time to soften it and then add to the yogurt, but I like mine crisp so add it at the last minute just before eating. My husband likes it soft though so I make the yogurt mixture, divide it in half and then soak the boondis in it for half an hour. And then add mine later just before eating.
Ingredients
2 cups plain yogurt
1/4 cup milk
1/2 tsp red chili powder
1/4 tsp cumin powder
1/4 tsp chat masala (optional)
salt to taste
3/4 cup Boondi
2 tbsp fresh coriander leaves
Method
- Beat the yogurt well, add the milk and beat again.
- Add the spices, red chili powder, cumin powder, chat masala and salt. Mix well to combine.
- store in the fridge till serving time.
- If you like the Boondi soft soak it in some water for 10 minutes, then drain and press gently between hands to remove excess water and add to the yogurt mixture.
- If you want to skip the above step and still want the Boondi to be soft, you can add it now and let it sit in the yogurt mixture for 1/2 hour.
- If you want it crisp like I want, add it to the yogurt mixture just before serving.
- If you like the Boondi soft soak it in some water for 10 minutes, then drain and press gently between hands to remove excess water and add to the yogurt mixture.
- Garnish with coriander leaves and serve.

I joined the Taste & Create, I loved the idea of this event where we are paired with someone different every month and have to cook from each other. I was paired with Swati of Chatkhor. I love Swati's spirit and the way she can make us smile..Laugh at times. I tried her Paneer Jalfrezi, since I love Paneer and had never tried or eaten Paneer Jalfrezi before.
I loved this recipe and could not have enough of it, did not make any changes to it, just halved it. You can get the original recipe by clicking on the link above.
Thank you once again Swati, this one is in my Paneer recipes list now.
One Friday morning hubby dear calls me at 10:30 AM and tells me few friends are coming over for lunch. Great Fridays are the days I don't have much left in the fridge. That's when decided to make a mixed vegetable, use a little bit of everything. Then realized did not have tomatoes, so used sour cream instead. This dish was made on the go just decided to add kitchen King Masala at the spur of the moment and loved the idea. I made paneer along with it again without tomatoes, since I always have paneer at hand. Everyone loved this dish, hubby realized there was none left for me and left what he had in his plate for me to taste and I should say it sure tasted great. We did not know what to call it so Hubby suggested Vegetable Badshahi since we were using Badshah's Kitchen King Masala.
Ingredients
1 onion, chopped
1 potato, diced
1 cup mixed vegetables (carrots, beans, corn, peas)
1/4 cup sour cream
1/4 cup milk
1 inch ginger, grated
1 tsp garlic paste
2 green chilies, chopped
1/2 tsp coriander powder
1/2 tsp red chili powder
pinch of turmeric powder
1 tsp Badshah Kitchen King Masala
salt to taste
fresh coriander leaves for garnish
Method
- Heat oil in a pan, add the onions and cook till translucent.
- Add ginger, garlic and green chilies. Cook for a minute.
- Add all the masalas, coriander powder, red chili powder, turmeric powder, kitchen king masala. cook for another minute or till the oil separates.
- Add the sour cream, mix well.
- Add the vegetables, salt and milk.
- Mix well and cook covered on Low heat till all the vegetables are cooked well. About 1/2 an hour.
- Check seasoning, add more milk if a gravy is needed and bring it to a boil.
- Garnish with coriander leaves and serve with roti, puri, chapati or Phulka.
Sindhi Curry reminds me of the lazy Sundays. For years we used to have Curry Chawara for lunch on Sundays. All the papa's would have Sunday off, the day would start with having idli dosa bought from outside in front of the TV seeing Mahabharat. All 13 members of the family would squeeze in the hall and have breakfast while watching Mahabharat. I loved that one hour. Then later all mama's will make curry chawara, took and chips for lunch. We don't make curry chawara every Sunday now but you will find Sindhis make it at least ones in 2 weeks.
Curry Chawara is also a function held during the wedding. We have to make Brahmins eat food which should not contain onions and garlic. Curry Chawara is the then made along with Waagan Aloo , Aloo Took, Mitha Boondhi (Sweet Boondhi), Curds and Phulka.
There are 2 kinds of Sindhi curry, one the main ingredient is Tomatoes and the second is Toar dal and Tomatoes. People add different vegetables to the curry, but the common ones are Guvar, Bhindi and Drumsticks. You can also add carrots and potatoes. I personally, do not add the Guvar since no one eats them at home and love carrots in the curry for the sweetness it adds. My veggie combo is Bhindi, Drumsticks and carrots.
Different households cook it differently. Traditionally the vegetables were cooked separately. Drumsticks and Guvar were boiled separately. Bhindi were deep fried, and then added to the curry. My personal feeling this way of cooking the curry does not get the flavours of the vegetable. I like the slow cooking process where the vegetables are boiled in the curry and let the flavours mix well. Mama always tells me the longer you keep cooking the curry on Low the better it will taste. Just remember to add the vegetable in order of cooking time. Drumstick take longer to cook so they are added first and then after 10 15 minutes bhindi is added. At the end all the vegetables will be cooked well. I have also heard that many people make this curry in the pressure Cooker, I have not tried this method.
The amount of tomato and spices can be changed according to taste. Below I have the basic method to make the curry. Besan is used as a thickening agent, add more or less depending on how thick you want the curry, but this is a thin soup like consistency.
Aloo Took is normally served along with Curry Chawara.
When Srivalli announced the Curry Mela, I knew I had to send this.
Ingredients
2 cups Tomato Puree ( Boil about 5 large tomatoes in water, blend them with a hand mixer or a blender, then pass it through a sieve to remove the skin) or use 2 cups Hunts Tomato Sauce or 1/3 cup Tomato Paste
2 tbsp besan (gram flour)
3 tbsp oil
1 tsp cumin seeds, Jeera
1 tsp mustard seeds, Rai
1/4 tsp methi seeds
a pinch of asefotida (hing)
salt to taste
1/4 tsp turmeric powder
1/2 tsp red chili powder
1 tsp Sugar
1 tbsp curry leaves
1 tbsp chopped cilantro
1 tsp chopped mint
2 green chili, chopped
1 tsp chopped ginger
6 bhindi / Okra
1 Drumsticks ( Cut to the length of Okra)
100 gms guvara
¼ cup carrots, Potatoes, cut in wedges (Optional)
2 Kukum Flowers (Optional)
Method
- In heavy bottom dish heat oil and fry cumin seeds,mustard seeds, asefotida (hing) and methi seeds.
- Then gradually add besan powder. Continuously stir the besan on medium heat till it is golden brown.
- Quickly add salt, ginger, green chili, curry leaves, red chili powder and turmeric to the mixture.
- Add 2 cups water.
- Add Tomato Puree or Tomato Paste and Kokum flowers.
- Stir everything together well. Bring to a boil.
- Add vegetables,Set the heat to low and let it slow boil for 20 minutes.
- Add sugar, mint and cilantro to the curry.
- Let it boil till vegetables are soft and cooked and the curry is of a soup consistency (not too thick).
- Remove from heat and serve with rice.
Note: You can change the amount of Tomato based on how Sour you want it and the combination of the vegetables are optional.
Back to Sindhi Recipe List
Aloo Took is but Potatoes double fried, soft in the inside and crisp on the outside. They are served with Curry Chawara. The crispiness of the took depends on the kind of Potatoes used. To get good tooks old Potatoes are used.
Ingredients
2 Potatoes,peeled and cut in 2 inch cubes
salt to taste
oil for deep frying
For garnish: As per taste
Red chili powder
Mango powder / amchur powder
Jeera powder
coriander powder (optional)
Salt (optional)
Method
- Wash and dry the potatoes well. They should be completely dry.
- Deep fry the potatoes on medium heat till the are cooked and tender.
- Remove and drain on a tissue paper.
- Once they are cool enough to handle, place one potato cube on a flat surface and flatten it with your hand to form a disc. Do not use too much pressure it will break and lose shape.
- Repeat the above step for all the potato cubes. ( You can cook them till this step and keep them aside in an airtight container in the fridge fr 24 hours).
- Deep fry the disc on high heat till they are golden brown.
- Drain them on tissue.
- Sprinkle the garnish when still hot and serve immediately.
Back to Sindhi Recipe List
Hubby and me are not big fans of Chinese, we say that often but after the wedding when I was in Bangalore 80% of the time we went out alone for dinner we had Chinese, in a place called Kim Lee, the service was good and fast and we loved the food. Then Beijing Bites opened 2 minutes away from home so we did have there too a couple of times. At home Chinese is made at least 2 times a month. But when asked we still say naa we don't like Chinese food that much. 
Anyways Manchurian, sweet and sour is something I make often since it is quick. There may be fried rice or noodles, or just soup and bread along side. This goes to the AWED - Chinese Cuisine hosted by Dhivya of Culinary Bazaar
Ingredients
1 cup Baby Corn, I used frozen
1/2 onion , cut into 1 inch squares.
1/2 bell pepper, cut into 1 inch squares.
4-5 cloves garlic, crushed.
1 green chili, Chopped (optional)
2 spring onions, chopped with greens
2 tbsp tomato ketchup
1 tbsp soya sauce
1 tsp balsamic vinegar
1 tsp cornflour, dissolved in 1/2 cup water
1 tsp pepper
salt to taste
Method
- Heat oil in a saucepan, add the baby corn in batches and brown them on both sides and cook completely. Remove from pan and keep aside.
- Heat more oil in the same pan, add garlic, the onions and bell peppers, cook for 2 mins they should be crisp. Add the baby corn.
- Add Ketchup, soya sauce, vinegar and sherry. Cook for 1 min.
- Add the corn flour mixture, salt and pepper, bring it to a boil.
- Add the green onions. Mix well.
- Serve immediately
Kadoo in Sindhi is Lauki/Bottle Gourd.
When Pooja of My Creative Ideas announced the Vegetable of the Week - Bottle Gourd, I was so excited I love bottle Gourd but we do not get it in the city we live. When I managed to get it, I wanted to make so many things. One of the most common ways Sindhis cook it is the Ras Patta Kadoo, quick, simple and yumm. Have posted it before. So then I decided ok I will make the Kadoo Ja Kofta, Alka was quick and she posted it before I could, her is slightly different than the one we make so it would be good to post it.
Finally I landed up posting Jeera Kadoo recipe, after the recipe will let you know how and why. We make this either dry to accompany a dal, chawal and Phulka. Sometimes we make a little gravy and have along with puri or Phulka. This time I made a little gravy since there was no dal and made it in the pressure cooker. You can cook it on Dum adding very little water to get the dry version, it takes little longer but its worth the wait. Gravy or no Gravy you cannot have enough of it.
Ingredients
2 1/2 cups (625 gms) Kadoo, cut into 1 inch pieces.
1 tsp jeera
10 curry leaves
2 green chili, chopped
2 tsp coriander powder
1/2 tsp red chili powder
1/4 tsp turmeric powder
1/2 tsp sugar
1/4 tsp mango powder (amchur/ Khat in Sindhi)
salt to taste
fresh coriander leaves for garnish
1 tsp oil
Method (Cooker Version)
- Heat 1 tsp oil in a pressure cooker. Add the jeera and let them splutter.
- Add the curry leaves, green chili, coriander powder, red chili powder, turmeric and sugar. Cook for a minute taking care not to burn the masalas.
- Add the Kadoo, mix well till they are coated with the masala.
- Add 1/2 cup water, amchur and salt.
- Give 2 whistles. Let the steam out naturally.
- If there is less gravy add more water and give it a boil.
- If there is more gravy, boil the gravy to reduce to desired consistency.
- Garnish with fresh coriander leaves and serve with puri or Phulka.
Method (Dum Version)
- Heat 1 tsp oil in a pan. Add the jeera and let them splutter.
- Add the curry leaves, green chili, coriander powder, red chili powder, turmeric and sugar. Cook for a minute taking care not to burn the masalas.
- Add the Kadoo, mix well till they are coated with the masala.
- Add 1 tbsp water, amchur and salt. Mix
- Lower the heat and cover the pan.
- Cook on low, stirring regularly and adding 1 tbsp of water only if it sticks to the pan. Lauki releases a lot of water so you may not need to add more water. About 1/2 hour.
- Once the Lauki is tender, add more water if you need a gravy or boil the extra water if any to get the desired consistency.
- Garnish with fresh coriander leaves and serve with puri or Phulka.
Now for the how and why, I had seen so many Bharwan Lauki recipes and always wanted to try it. I ventured out on Google and most of them required Potato filling in a tomato based gravy. So I decided to give it a slight twist, I had spinach so I made a Spinach Filling, had to plan in action just went with what I felt will taste good. Once the Lauki was done and filled, it looked great I took some pictures, it was nice and sunny, it was around 6 PM in the evening. Ok now I was satisfied the the Lauki is stuffed with no disasters. So now for the gravy, Spinach in tomato gravy was not tempting so went made a nice creamy Kaju (Cashew) Gravy. By the time it was done and I went out to take the picture the Sun had what..vanished. We normally have sunlight till 9 PM and that day It had to set by 7 PM. I anyways took the picture, it was no so good but no choice. My hubby loved the Lauki it was rich and nice and loved the spinach and Cashew combo.
Now you all must be wondering why is she blabbering about Bharwan Lauki we are here for Jeera Kadoo, well it so happened that I had to leave and come to stay with mama and am with her from past 10 days, so I decided will make it once more and take a good picture. This weekend we bought Kadoo again and from Friday I have been telling her no I will cook the Kadoo please don't touch it. Sunday came and we had to cook food for my husband to take along with him and the lazy me had not touched the Kadoo. Now who feels like cooking when Mothers are around, not me. Anyways at 4 PM finally I had no choice I had to go into the kitchen and then decided to make another Sindhi recipe instead the Jeera Kadoo, which when made in the cooker is done within Half an Hour.
I sat down to actually post about Bharwan Lauki, and now I could not remember exactly what went into the gravy...Well thats sad should have written it out. That's why I am posting Jeera Kadoo instead till I re-create the Bharwan Lauki and this time try to remember what I did. Anyways here is the picture and the general way how I made it.

- Slightly Boil the Kadoo. Scoop out the center to make a tunnel.
- Spinach Filling: I sauteed some spinach with garlic, onion, scopped out kadoo and green chilies. Made it simple. Love the combination of garlic and spinach.
- Stuff this filling into the lauki. Shallow fry it. Cooked completely by now. I covered it for a while. Slice the Lauki once cool enough to handle
- Cashew Gravy: Soak Cashews in milk for some time.Grind soaked cashews, onion, ginger, garlic and green chili and full garam masalas like cardamom, cloves and black pepper corns to a paste. Heat oil in a pan and cook this masala till oil separates. Add milk and give it a boil. Add the lauki slowly, try not to mix. Cover and cook till the flavors are soaked in. Serve.
Back to Sindhi Recipe List
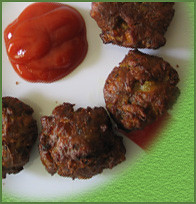
The minute I saw these in Vaishali's blog, I knew I wanted to make them. Came with them fond memories when papa would but these along with other bhajji's like banana, potato and mirchi bhajji's and mama would make dal that night and we would have them with dal and roti.
Made these when I had some friends over, it was easy to make and everyone loved it. I served it along with pudina chutney. I had to quickly take the snaps and continue frying more before they vanished.
Thank you so much Vaishali for this lovely recipe, I loved the cinnamon and the saunf and it tasted just like the ones we used to have in Bangalore.
Click here for the recipe.
Seyal Bread Dahi Mein - Bread Upma in Yogurt
11 comments Posted by Medhaa on Saturday, July 12, 2008Bread Upma is a quick breakfast recipe and a good way to finish stale bread, and when made in yogurt it is quicker and great during summer. Mama made this today it nice and hot here finally I here many people complaining but I am not.
Ingredients
1/2 loaf bread
2 cups curds/yogurt
2 tbsp besan
1 tsp sugar
2 green chili, slit
pinch turmeric
3 tbsp coriander leaves, chopped
3 mint leaves, pudina, chopped
pinch hing / asafetida
1 tsp mustard seeds
2 dry red chilies
10 curry leaves
2 tbsp peanuts
salt to taste
1 tsp oil
Method
- Cut the bread slices in 4.
- Beat the yogurt well. Add besan, salt, sugar, turmeric, coriander leaves, pudina and green chili to the yogurt. Mix well.
- Heat 1 tsp oil in a kadai. Add hing, mustard seeds. Let them splutter. Add the curry leaves and red chili.
- Add the peanuts and fry them well till they are nice and brown. About 2 minutes.
- Add the yogurt mixture.
- Add the bread pieces. Mix well.
- Cook till the bread has absorbed the flavors and heated through. About 3 to 4 minutes.
- Serve immediately.
Note: If you like a dryer version, dip the each piece of bread in the yogurt mixture and keep adding it to the kadai one by one, instead of adding the yogurt first and then the bread. At the end put the left over yogurt if any. And cook as mentioned above.
Back to Sindhi Recipe List
Paneer or Indian Cottage Cheese, by now I would have told umpteen times how much I love paneer I can not have enough of it. Mom used to make paneer at least 2 times a week and if papa has gone on tour then paneer may be made every day too. I was a fussy eater as a kid but mama would add paneer in most dishes so that I would eat something at least. Oh I so love it. Even when I go visiting all my uncles and aunts know what to cook for me and I make no fuss. I wont eat any other dish prepared and only the paneer. And in restaurants thats the only dish I order. That's the love I have for paneer. So when Vandana announced the Paneer-A delicacy I can not be happier. Thanks to mom we make paneer in varied forms and there is so much to share wish I could share everything. But for now one of my favorites Methi Paneer, which is quick to prepare and I love it since there is no grinding involved.
I do not prefer to fry the paneer for trying to make it a little healthy. All my paneer dishes so not ask for frying the paneer. But if you prefer feel free to fry the paneer. Some cases you do need to have the paneer crisp, or browned I will then just shallow fry it in little oil, or bake them.
Serves 8
Ingredients
400 gms paneer, cut into cubes.
2 onions, chopped
1 tomato, peeled and chopped
1 cup fresh methi leaves, chopped
2 green chili, chopped
2 inch ginger, grated
1 tbsp garlic paste, or crushed well
1/4 cup sour Cream / or thick curds
1/2 cup milk, or more
1 tsp coriander powder
1 tsp red chili powder
1/4 tsp turmeric powder
1 tsp sugar
1 tsp chana masala, I also sometimes add King Khan Masala
salt to taste.
2 tsp oil
Method
- Heat oil in a pan. Add the garlic, ginger and green chili's. Cook till the ginger starts turning brown.
- Add the onions and cook till they are translucent.
- Add the coriander powder, red chili powder, turmeric, sugar and Chana Masala/King Khan Masala. Cook for a minute till oil separates.
- Add the tomato and cook till oil separates, About 5 minutes.
- Add the methi and sour cream/thick curd.
- Once the methi wilts, add the paneer, salt and milk. Boil and then simmer for 5 minutes.
- Add more milk if you want more gravy. Serve hot with roti, naan, puri etc.
Note: The gravy easily drys up, just before serving add some water or milk for creamier gravy and give it a boil.
More Paneer recipes
Palak Paneer
Paneer Malai Tikka
Paneer Makhanwala
Achari Paneer
Love the sweetness of Beetroots and would normally have them boiled in salad. But recently I started making curries out of it and loved it. After some trials and errors we loved this one. Hope you guys enjoy it too
Ingredients
1 cup beetroot, cut into small cubes
1 onion, chopped
1/4 cup pureed tomato
10 curry leaves
1 inch ginger, grated
1/2 cup curds
1 tsp coriander powder
1/2 tsp red chili powder
1/4 tsp turmeric powder
salt to taste
coriander leaves for garnish
Method
- Heat 1 tbsp oil in a pressure cooker. Add the curry leaves. Add the onions and cook till they are translucent.
- Add coriander powder, red chili powder and turmeric powder. Cook for a minute.
- Add ginger and tomatoes and cook till the oil separates.
- Beat the curds well and add it to the pressure cooker.
- Add the beetroot, salt and 1/2 cup water.
- Give 2 whistles. Let the pressure release.
- Garnish with coriander leaves and serve with puris or roti.
The day Swati of Chatkor posted her Bihari Palak Khichidi Aur Uske Char Yaar, I had to try it. Showed mama the recipe and she said we have everything at hand, by the time I browsed some more and went down she had soaked everything that was needed and even cut the vegetables. So the only thing I did was put everything in the cooker that was easy.
Swati I cant thank you enough this was excellent and will be a regular now at our place. It was easy,filling and so healthy.
We did not use Masoor dal since we ran out of it so mom soaked Chana dal. Also we were not supposed to have onions that day so we skipped the onions and used vegetables like Cauliflower, Broccoli, Beans and Carrots. Mom cut them in bigger pieces and also we added soaked Soya granules and not cooked ones. At the end everything was well blended and we had a nice bite to the vegetables too. Rest of the recipe was like mentioned here
This is how we made it.
Ingredients
1/4 cup Chana dal
1/2 cup Moong dal(split green lentil)
2 cup spinach, chopped
1 cup rice
1 cup vegetables of your choice(Cauliflower, Broccoli, Beans and Carrots)
1 cup soy granules, Soaked in water
1 Cardamom, seeded
2 cloves
1 Black Cardamom seeded
1" Cinnamon stick
5 black pepper corns
1 tsp chili powder
1 tsp Cumin seeds
1 tsp cumin powder
2 tsp Coriander powder
1 tsp garam masala,
1/2 tsp turmeric
Method
- Heat some 1 tsp ghee(clarified butter) in a pressure cooker
- Add cardamom, cinnamon, cloves and black pepper corns. Fry for a minute
- Add the cumin seeds and let it splutter.
- Add all the vegetables, spinach and soya granules.
- Add coriander powder, cumin powder, red chili powder, garam masala and turmeric and cook for a minute.
- Add the lentils and the rice, fry for a minute.
- Add 4 cups of water. Close the cooker and give 2 whistles.
- Let the steam out naturally and serve with the Char Yaars as Swati Mentioned.
In the Rajma Chawara Post I spoke about the versatile masala, here again I use the same masala but change the quantities of the ingredients, I add more greens here to give that nice green color and less of Tomato. Rest everything remains the same except that now we cook the Lima beans in the gravy and not separately.
In Bangalore we used to get fresh avlaikai (hope I spelt it right) we used to cook them in this same gravy.
Ingredients
1 cup frozen Lima Beans
1 tsp coriander powder
1/2 tsp red chili powder
a pinch turmeric
salt to taste
fresh coriander leaves for garnish
lime juice as per taste
The Masala
To be ground to a paste
1 onion, chopped and fried till golden brown
1 onion, chopped
1/2 large tomato
1/4 cup curds/yogurt
4 garlic pods
1 inch ginger
2 green chilies
2 tbsp fresh coconut, grated
1/2 cup fresh coriander leaves
1/4 cup mint leaves
10 curry leaves
5 whole black pepper corns
2 green cardamom
1 inch Cinnamon sticks
2 cloves
1 tsp cumin seeds
Method
- Heat 1 tsp oil in a pressure cooker, add coriander powder, red chili powder and turmeric powder. Cook for 1 minute on low.
- Add the ground paste and cook on medium till the oil separates.
- Add the Lima beans along with 2 cups of water, and salt.
- Close the cooker and cook the Lima beans. (About 3 whistles)
- Let the steam out naturally.
- Check seasoning. Add lime juice. Boil till required consistency. Garnish with coriander leaves.
- Serve hot with cooked plain rice or phulka.
Love Rajma chawara anytime, this is the way mamma cooked it and now I cook it. The ground masala is versatile and anything can be added, chickpeas, any assortment of vegetables taste great too. We have also tried this masala with chicken and its lovely.
Ingredients
1 cup Rajma (Red Kidney Beans)
handful curry leaves
1 tsp coriander powder
1/2 tsp red chili powder
a pinch turmeric
1/4 tsp garam masala
salt to taste
fresh coriander leaves for garnish
lime juice as per taste
The Masala
To be ground to a paste
1 onion, chopped and fried till golden brown
1 onion, chopped
1 large tomato
1/4 cup curds/yogurt
4 garlic pods
1 inch ginger
2 green chilies
2 tbsp fresh coconut, grated
1/4 cup fresh coriander leaves
few mint leaves
5 whole black pepper corns
2 green cardamom
1 inch Cinnamon sticks
2 cloves
1 tsp cumin seeds
Method
- Soak rajma in about 4 cups of water overnight, or 12 hours.
- Discard the water and cook them in a pressure cook, till tender. (Add salt along with the water while boiling the rajma).
- Heat 1 tsp oil in a kadai, add the curry leaves, coriander powder, red chili powder and turmeric powder. Cook for 1 minute on low.
- Add the ground paste and cook on medium till the oil separates.
- Add the cooked rajma along with the water and give it a boil.
- Add water as per the consistency required.
- Add garam masala powder, simmer for 15 minutes.
- Check seasoning. Add lime juice. Garnish with coriander leaves.
- Serve hot with cooked plain rice.
Back to Sindhi Recipe List

Ingredients
1 cup Basmati rice
2 to 4 peppercorns
12 mm. (1/2") piece cinnamon
2 cloves
2 green cardamom
1 onion, chopped
1 cup carrot, grated
1 cup boiled chickpeas or canned chickpeas
1/2 lime juice
1 tablespoon oil
salt to taste
Method
- Wash the rice and keep aside.
- Heat the oil in a pressure cooker, add the peppercorns, cinnamon, cloves, cardamom and onion and fry for some time.
- Then add the carrots and chickpeas and stir for a few seconds.
- Add 2 cups water, salt and lime juice and let the water boil.
- Finally, add the rice and perssure cook for 2 whistle. Allow the steam to escape before opening.
(Spinach Dal)
This is a simple and yet very healthy dal.
Ingredients
1 cup whole moong dal
3 cups spinach/Palak, washed and chopped
1 tbsp chopped garlic
2 green chilies, chopped
1 inch ginger, grated
1 onion, chopped
1 tsp coriander powder
1/2 tsp red chili powder
a pinch of turmeric
1/2 cup curds/plain yogurt
juice of 1/2 lime (or as required)
salt to taste
Method
- Soak the dal in water for about 1 hour.
- Add the dal, spinach, onion, garlic, ginger, green chili and salt in a pressure cooker. Add about 3 cups of water.
- Cook the dal in the pressure cooker till soft and tender. About 4 whistles.
- Let the steam out naturally.
- Boil the dal to required consistency, add more water if required.
- Beat the curds well and add to the dal.
- Heat 1 tsp of oil in a pan, once the oil is heat turn of the heat add the coriander powder, red chili powder and turmeric and immediately add to the dal.
- Mix the dal well, check seasoning and simmer for 10 minutes.
- Serve with roti, Phulka, chapati.
Back to Sindhi Recipe List
This is what is made at home when we have left over pakoda's. You can make fresh ones too for this curry. There is no specific recipe for the pakoda's, you can use any mixed vegetable, onion pakoda, sanna pakoda (recipe to be posted soon), or like I did with the left over Sai Bhajji Tikki I had made. This is so quick to make once we have the pakodas ready.

Ingredients
10 Pakodas, I used the Sai Bhajji Tikki (Use as many as you want)
2 tomatoes or 2 tbsp tomato paste
2 green chili
1 inch ginger
handful curry leaves
1 tsp mustard seeds (Rai)
1 tsp Cumin seeds (Jeera)
a pinch of asefetida (Hing)
1/4 tsp coriander powder
1/2 tsp red chili powder
1 tsp sugar
a pinch of turmeric
salt to taste
2 cups water
coriander leaves, chopped
Method
- Grind/Puree the tomatoes, green chili and ginger together if using fresh tomatoes. If using Tomato paste, chop the green chili and grate the ginger and mix them to the paste
- Heat 1 tsp oil in a pan. Add the hing, mustard seeds and jeera seeds.
- When they start spluttering add the curry leaves, coriander powder, red chili powder and turmeric. Cook on low for 30 seconds, not burning anything.
- Add the pureed tomato / tomato paste and cook till the oil separates.
- Add the 2 cups water (Can adjust the water according to the consistency required), salt and sugar. Mix well.
- Bring it to a boil, reduce it and simmer for 5 minutes.
- Just before serving, bring the curry back to a boil and then add the Pakodas and the coriander leaves.
- Serve with rice.
I have joined the NaBloPoMo - National Blog Posting Month group, after reading Srivalli's post. I was not sure if I can keep posting every day for 31 days but when I commit to something there is no looking back. So look out for 31 food posts.

Back to Sindhi Recipe List
Mangalore Bajji also known as Goli Baje is a south Karnataka dish. I used to regularly have it Airlines Hotel in Bangalore, I would love to go there with mama and play in the swing and slide there and have Plain Dosa and the Mangalore Bajji's, they would not make it everyday and I would be so disappointed when they did not have them. Now blogging has made it so easy to get a recipe and make it on your own.
I used to do a google search for Mangalore Bajji and would not get the right recipe and searching for it I learnt that they are also called Goli Baje, and then I got the recipe. I followed Ramya of Mane Adige's recipe, it was delicious and tasted the same. We had it with some tea in the evening, the best part is it is so easy. I did not make too many changes to the recipe except I added about 1 tbsp coconut since in Airlines I remember them having coconut pieces. I actually forgot to add the baking soda in the first batch and they were hard. Then I added the soda and wola...
Thank you Ramya We loved them and am so glad I finally got the recipe for it.
Sireesha has passed on the Nice Matters Awards and easycraft have passed on the BLOGGER WITH A PURPOSE AWARD, thank you so much for the award.
 |  |
I would like to pass these awards to
Sashree of A warm Welcome to All Foodies
Alka of Sindhi Rasoi
Swati Raman Garg of Chatkor
Cham of Spice-Club
Sashree also tagged me for a meme,
What are five things on my to-do list for today (non-work related)?
- Clean the kitchen
- Iron the Cloths
- Go to the library
- Check post, we do not get mail at home.
- Cook many thinks for my hubby since I am not at home whole of next week.
What are five snacks I enjoy?
- Muruku
- Mangalore Bajji
- Bhel Puri
- Chips
- Paneer Pakoda and many more
What things would I do if I were a billionaire?
Get confused what to do....
Places I’ve lived:
Bangalore, Chennai, Toronto and Palmerston
Jobs I’ve had:
Web Designing Trainer (Teacher), Retail Accounting Clerk, Banking Clerk, Special Projects Developer, Web Designer and now the one I love the most House wife..:)
Alka of Sindhi Rasoi
Swati Raman Garg of Chatkor
Cham of Spice-Club
One more aunthentic Sindhi recipe, this is like a daily dal in sindhi household. Serve it with Bhugha Chawra and a spicy potato bhajji.
Ingredients
1 cup yellow dal (split moong dal), soaked in water for 2 hours
1 large onion, chopped
1 large tomato, chopped
2 green chillies, chopped
1 inch ginger, chopped
2 cardamoms
2 cloves
5 black pepper corns
1 tsp corriander powder
1/2 tsp red chilli powder
a pinch tumeric powder
curry leaves
juice of half a lime
ghee
salt to taste
chopped fresh corriander leaves
water
Method
- Heat ghee in a pressure cooker on high heat.
- Add cardamom, cloves and black pepper corns.
- Add the onions and saute them till they are dark brown (caramalized).
- Add the curry leaves, corriander powder, red chilli and tumeric powder.
- Add the tomatoes and cook till the oil seperates.
- Add the dal, salt and water till about 1 inch above the dal.
- Cook the dal in the pressure cooker till it is mushy (About 4 whistles).
- Open the cooker once the steam is out and add lime juice.
- Garnish with fresh corriander leaves.
- Serve with Bhugha Chawra.
Back to Sindhi Recipe List
(Rice with Caramelized Onions)
Plain rice may be fine for family and for some specific dals and curries, but when we entertain, a more festive version is usually required, Bhuga Chawra, with the added sweetness of the caramelized onions, it is an easy and delicious choice.
Ingredients
1 cup rice
1 tbsp Ghee
1 large onion, thinly sliced
2 cardamoms
1 inch cinnamon stick
2 cloves
5 black pepper corns
2 cups water
salt to taste
Method
- Wash Rice and soak in water.
- Heat Ghee over high heat in a large saucepan.
- Add the cardamoms, cloves, cinnamon and peppercorns.
- Add the onions,cook until the onions are golden brown.
- Drain the rice and add to the onions.
- Add 2 cups of water and salt stirring gently.
- Bring to a boil and reduce the heat to low.
- Cover the saucepan and simmer for 10 mins, till the rice is cooked.
- Serve with Makhani Dal or just have it plain with yogurt
Note: Can also be made in a pressure cooker. Once the onions are browned, add 2 cups of water into the cooker and let it boil, then add the rice and give 2 whistles. Rice is done.
Back to Sindhi Recipe List
About Me

Awards
 Yummy Blog Award, thank you easycraft
 Rocking Girl Blogger, thank you Sashree, Skribles, easycraft and Neha
 Inspiration Award, thank you Sashree
 Wylde Woman Award, thank you SriLekha
 Brilliant Weblog, thank you vani, easycraft and Alka
 Blogging Friends Forever, thank you Pallavi
 Just Nice Photos - Beautiful Site, thank you Bhawana
 2008 Best Blog Darts Thinker, thank you Bhawana
 Big Bear Hug, thank you Bhawana
